Sun-faded in the middle, ringed with ghostly white circles, it had the washed-out look of a black-and-white photo left too long on a windowsill. The carpenter ran his hand along the surface, as if greeting an old friend who’d lost their spark.
He didn’t bring a big sander, or a loud machine. Just a small bottle, a folded rag, and something that looked suspiciously like a kitchen sponge. No gloves, no mask, no drama. He worked in silence, moving with the slow confidence of someone who knows exactly what will happen next.
Thirty seconds later, the wood in front of him was almost unrecognisable. Darker, deeper, alive again. As if somebody had turned the saturation slider back up on reality.
He called it “the color reset button for sad wood”.
The quiet tragedy of dull wood at home
Once you start noticing it, you see it everywhere: faded chair arms, greyish stair rails, pale window sills that used to glow honey-gold in the afternoon light. Wood doesn’t die fast. It just slowly loses its voice. One layer of dust at a time. One coffee cup ring at a time.
That’s what this carpenter was talking about as he moved around the workshop. For him, dull wood isn’t just an aesthetic problem. It’s a sign of stories going quiet. The dining table that hosted birthday cakes. The crib that became a desk. The doors that heard every slammed argument and every whispered apology.
On a phone screen, these pieces might look like “junk to replace”. In real life, they vibrate with years of use. They just don’t shine anymore.
He showed me a set of maple kitchen cabinets someone wanted to rip out. The fronts were patchy and flat, like they’d been drained. They had that tired rental-apartment look: technically fine, emotionally lifeless.
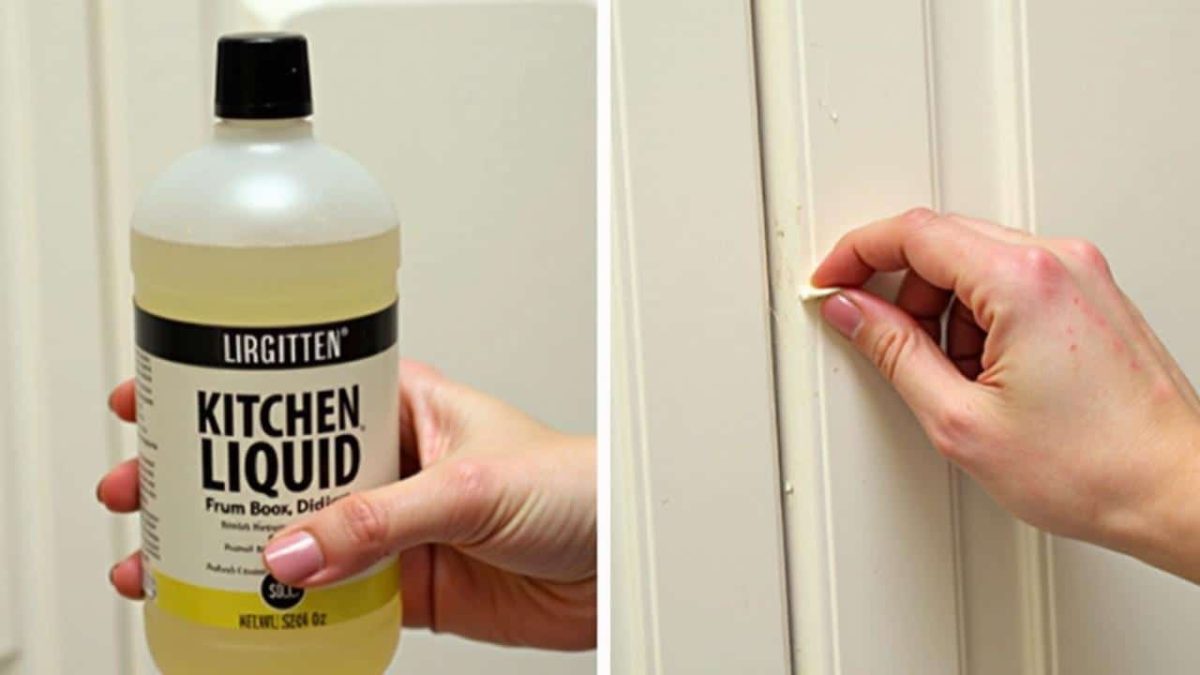
Instead of quoting a full refit, he proposed a test. One door only. The owner agreed, half convinced it wouldn’t change much. It took him less than a minute to prep a small area and work in his “secret mix”.
By the time the rag left the surface, the difference was shocking. The grain snapped into focus. The amber tone came back, like a light turned on from inside the wood. The owner ran her fingers over it, laughed, then actually apologized to the cabinet door for giving up on it so quickly.
➡️ The body signal that often appears weeks before burnout hits
➡️ Forget baking soda: this housekeeper’s trick makes bad odors disappear for good
➡️ The exact moment in the day when your brain solves problems the fastest
➡️ Road safety signals Here’s what a yellow rag on a motorbike’s handlebar really means
➡️ One spoon is enough : Why more people are putting coffee grounds in the toilet
There are numbers behind this quiet magic. Real estate agents talk about “perceived value”, and wood plays a big part. A study of housing photos showed that warm, rich wood tones consistently led to higher click‑through rates online than flat laminates. That’s pixels on a listing. Imagine what it does in a real hallway or living room.
The carpenter’s point was blunt: people spend thousands on new furniture when a lot of what they own is just… under-lit. Not broken. Not outdated. Just hidden under dryness, dust, and the wrong products.
The fix, he claimed, rarely takes more than a few minutes per piece.
The “wet reveal” that changes everything
His secret starts with something very simple: a test patch and a drop of liquid. Before he reaches for products, he takes a clean, damp cloth and wipes a small, sad-looking area. The wood darkens instantly under the water and the grain pops. Then, as the water evaporates, the dullness creeps back in.
“That’s the preview,” he said. “You’re not adding anything yet. You’re just asking the wood what it wants to be again.” If the “wet look” brings out beautiful color, he knows it’s a surface problem, not a lost cause. The goal is to make that wet richness permanent, without leaving the surface greasy or sticky.
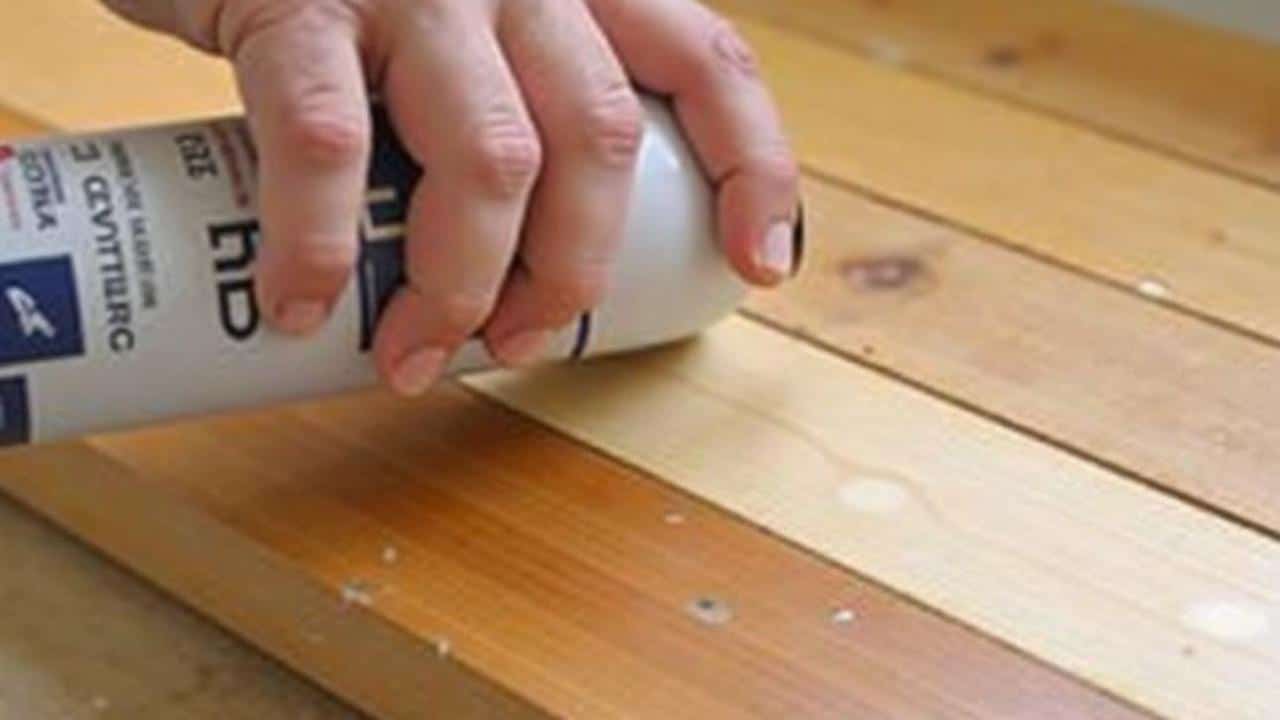
From there, he moves to his mix: a blend of clear wood conditioner or oil, a tiny bit of compatible stain if needed, and something unexpected – ultra-fine abrasive pad or 0000 steel wool. The liquid feeds the wood, the gentle abrasion opens the pores and levels micro-scratches. The secret isn’t the brand. It’s the choreography.
On a scratched walnut side table, I watched the dance step by step. First, he wiped away dust with a barely damp cloth and let it dry. Then he lightly loaded the pad with his mix. Not soaked. Just kissed by the product. He worked along the grain in slow, deliberate strokes, like polishing a lens.
The table didn’t look shiny at first. It looked… wet and a bit scary. But after a minute, he grabbed a clean cotton rag and wiped off every bit of excess, again following the grain. What stayed behind was thin, even, and almost invisible.
As it settled, something subtle happened. The shallow white scratches softened. The blotchy patches evened out. The warm brown came back from somewhere under the surface, like a photograph resolving in a darkroom tray. It hadn’t been “restored” in the grand sense. It just looked like itself again, ten years earlier.
He explained it simply: dry wood scatters light. Conditioned wood channels it. When the fibers are parched, light hits them in a chaotic way, making everything look chalky and grey. Once you rehydrate and slightly burnish the top layer, the light dives in, bounces along the grain, and returns with color.
Stripping and heavy sanding rip that top layer away. His method barely grazes it. “Most pieces don’t need a second life,” he said. “They just need a glass of water and a comb.” Technically he’s adjusting absorption and sheen levels. Emotionally, it feels like unmuting something.
The crucial detail: he works thin. Thick coats sit on top like plastic. Thin passes melt into the wood, drying faster and feeling more natural to the touch. That’s why the change looks so instant. You’re not waiting for a big, gummy layer to cure. You’re watching thirsty fibers drink.
How to steal the trick (without wrecking your furniture)
The core move is almost embarrassingly simple. Start by cleaning the piece with a soft cloth and a mild, wood‑safe cleaner, then let it dry fully. Do the “wet reveal” on a hidden corner: damp cloth, quick wipe, watch how the color transforms while it’s wet.
If you like what you see, mix a small amount of clear finishing oil or conditioner with a drop or two of matching stain in a jar. Dip an extra‑fine abrasive pad or a piece of 0000 steel wool into the liquid, then press off the excess on a paper towel. The pad should feel barely moist, not dripping.
Working with the grain, glide the pad across a manageable area – think one drawer front, not a whole wardrobe at once. Use light pressure, like you’re cleaning glasses, not scrubbing a pan. After 20–30 seconds, take a clean cotton cloth and buff off everything that hasn’t soaked in. That’s the moment the wood’s true color steps back into the room.
This is where most people lose the game. They either drown the surface, skip the wipe‑off, or try to “fix everything” in one ecstatic pass. The carpenter has a line he repeats almost like a prayer: “Thin to win.” A heavy coat might look satisfying going on, but it’ll dry blotchy, sticky, and prone to attracting dust.
Soyons honnêtes : personne ne fait vraiment ça tous les jours. So give yourself permission to go slowly when you do it. Work on one piece after dinner. Watch how the wood reacts. If it drinks the mix instantly and still looks dry, you can repeat the process the next day.
There’s also the fear factor. Many people are so worried about “ruining” a piece that they do nothing for years, and the wood keeps drying out. That’s why test patches on the back or underside matter. They’re your safety net. Once you see that the color is richer but not radically different, the anxiety drops a notch.
“I don’t restore wood,” the carpenter told me, leaning on a pile of doors. “I restore people’s courage to touch their own furniture.”
He had a short list taped to the wall for anyone trying the trick at home:
- Always test your mix on a hidden area first.
- Wipe off more product than you think you need to.
- Work with the grain, not across it.
- Let each thin pass dry before deciding to do another.
- Stop the moment the wood looks alive again.
On a practical level, this approach saves money, time, and landfill space. On a quieter level, it changes the way you look at the objects in your house. That dull banister you pass every morning isn’t “old”. It’s waiting. *Waiting for somebody to remember how much color it can still hold.*
When wood wakes up, rooms change
There’s a funny thing that happens once you’ve seen this trick in action. You start mentally “wet revealing” everything around you. The café counter that’s gone grey at the edges. The armrest of the bus seat polished by a thousand hands. The heirloom chest in your parents’ hallway that everyone thinks is beyond saving.
On a screen, A/B tests show the effect in numbers. In a living room, you feel it in your chest. A sideboard that looked tired yesterday suddenly anchors the whole wall with warm, steady weight. A faded bed frame turns into a frame for light. It’s subtle, but your brain reads “cared for” versus “abandoned” in a fraction of a second.
What sticks with me from that workshop isn’t the specific brand of oil or the exact grit of the pad. It’s the mindset. The idea that dull wood isn’t a verdict, just a snapshot taken between drinks of moisture. That color can be coaxed back in seconds, not as a miracle, but as a conversation with a material that’s still very much alive.
We talk a lot about upgrading and replacing, less about listening and reviving. Maybe this little carpenter’s secret spreads because it scratches both itches at once. You get the thrill of seeing something transformed, without losing the history baked into every dent and knot.
And somewhere along the way, you might look at your own home differently – not as a showroom frozen in time, but as a place where things, like people, are allowed to come back to life.
| Point clé | Détail | Intérêt pour le lecteur |
|---|---|---|
| Test “wet reveal” | Humidify a small patch to preview the hidden color and grain | Permet de savoir en quelques secondes si la pièce peut retrouver sa chaleur |
| Mélange fin huile + abrasion douce | Huile ou conditionneur clair, touche de teinte, pad ultra‑fin | Restaure la couleur sans ponçage lourd ni finition épaisse |
| Application en couches ultra fines | Travailler par petites zones, essuyer l’excédent immédiatement | Obtenir un résultat rapide, propre et naturel, même pour débutant |
FAQ :
- Can I use this method on any type of wood?It works best on solid wood with an existing finish that’s just dry or dull, not peeling. Veneers can also respond well, as long as you keep the abrasion extremely light and test in a hidden spot first.
- What if I don’t know what finish is already on my furniture?Start with a clear, gentle wood conditioner or oil and skip the added stain on the first pass. Watch how the surface reacts and adjust slowly rather than guessing big.
- How long does the “restored” look actually last?On indoor pieces, the richer color can last many months to years, depending on sunlight, humidity, and use. A light refresh pass once in a while is usually enough to keep the wood looking alive.
- Will this remove deep scratches or white water rings?It can soften shallow marks and blend minor rings. Deep gouges or long‑standing water damage may need targeted repair, but they often look far less obvious once the surrounding wood is revived.
- Is there a risk of making the furniture look too shiny?If you work thin, wipe aggressively, and avoid heavy gloss products, the finish stays natural and low‑sheen. **The shine you see is mostly the wood itself, not a plastic layer on top.**